Paris has a delightful array of pastry to try. The chefs are constantly competing with each other to come up with the best croissant or the best new surprising cake. Things can get pretty "innovative" and sometimes it adds up to a disappointment but when you find a pastry chef that does a classic perfectly...well, its lovely.
Kouign Amann has been popping up around the city this winter, probably because its heavy, warm and full of delicious, comforting salted butter. I remember trying one when I first arrived in Paris (not knowing what it was or what to expect) and I didn't really enjoy it. Clearly, I did not know pastry at all then! Because this pastry is so wonderful I just can't live the rest of my life without it. And I think I love them event more because they are a regional pastry from Brenton (aka: Brittany).
Thank goodness for David Lebovitz coming through with a working recipe for me to try when I get home. I take back what I said before, David.
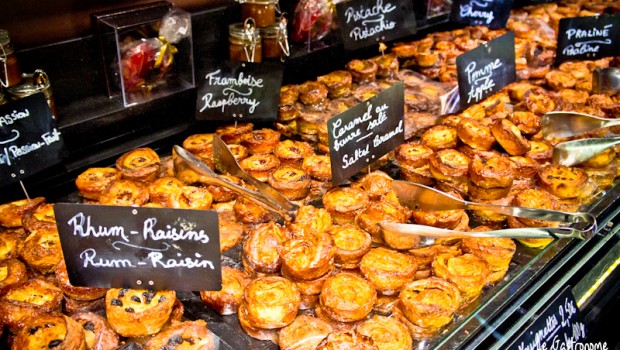
I bought myself some individual kouign amann yesterday so I could treat myself for breakfast today and clearly enjoyed it too much to take a photo for you all. So here are photos from the shop where I bought them. I don't really recommend the shop for his chocolate or anything else (even though he is an MOF) but if you are in the city looking for a treat, stop in and pick up some kouign amann. I recommend the salted caramel. You'll die a little and go to butter heaven. *Heat these babies up in the oven for a few minutes before you eat them and it will be even more amazing.
You're welcome.
Georges Larnicol, MOF
132 Blvd. St. Germain 75006
33 1 43 26 39 38
http://www.chocolaterielarnicol.fr/
*he has many boutiques throughout Paris, this is just one location.
Showing posts with label pastry. Show all posts
12.14.2012
11.14.2012
Recipe: Mille Feuille
Mille Feuille (1,000 leaves/layers) is still my favorite pastry. Specifically Mr. Pierre Herme's version filled with chocolate and praliné. Oh wow, I need to go get one of those soon.
I had dinner with a friend a few weeks ago at my apartment. She made delicious Korean BBQ ribs and I made the classic version of a vanilla mille feuille. The key to having a good mille feuille is to show off the two contrasting textures - crispy puff pastry with light and creamy vanilla cremé.
Want to give it a go? I think you should! It is a perfect surprise for Thanksgiving or Christmas! The best part is that you can make the pastry dough a day or two in advance. Just freeze the dough until its ready to be baked! OR if you really are pressed for time or simply don't want to attempt this somewhat daunting recipe - go ahead and buy frozen puff pastry from the market. Lets be honest, sometimes there is just NO time.
Pate Feuilletage Inverse (Puff Pastry dough)
Oven: 450F or 230C
400g Butter
130g Flour
In your mixer, combine butter and flour until smooth and homogenous. Form this into a cube and wrap with plastic. Refrigerate until ready to use.
270g Flour
10g Salt
140g Water (approx.)
In your mixer, combine all ingredients to create a firm detrempe (read:dough). This is a French culinary term for the first stage in the process of making puff pastry, which requires only flour and water. After, form into another cube, wrap with plastic and refrigerate for 30 minutes.
Onto a floured surface, roll out your butter dough in a rectangle just enough so that you can wrap the detrempe inside of it. Place the detrempe in the bottom half of the butter dough and fold the butter over the detrempe to enclose it as if it is a giant ravioli. Note: don't be afraid to use flour on the counter and the top of the dough, butter is easily melted and sticky so you will need to use flour to prevent the sticking and if the dough gets too warm and soft stick it in the refrigerator to firm up again.
Press together the ends of the butter to close everything up. Place the dough with the longest seam to your left, as if it is a book (an upside down one). Roll the dough out to about 10 cm x 35 cm long. Now you will give the dough its first "turn". Visually divide the dough into thirds. Fold the top third down and fold the bottom third up. It will end up looking like this.
Repeat this three more times to total four turns keeping the long seam to the left. Remember, if the dough gets too warm and starts sticking to your table wrap it and refrigerate it until firm again (15 mins-30 mins).
PHEW! The hard part is over. Now let your dough rest in the refrigerator for an hour or so. When you are ready, roll out the dough to the size of a baking sheet (normally 40cmx60cm). This size will give you enough servings for about 12-13 people. The thickness should be about 1 cm and it should be even in thickness all the way through. After you have rolled it out, let the dough rest in the fridge again for an hour because it is elastic and will retract a little. (This is when you would want to freeze the dough if you want!!)
Bake at about 190C/375F until golden brown and crispy. (If you can manage, flip the pastry half way through - probably about 30 minutes).
BRAVO!!
Now, pastry cream.
750g milk
250g cream
1 vanilla bean, split and scraped
200g sugar
80g corn starch
220g egg yolks (about 6)
50g butter, unsalted, cut into pieces
In a medium saucepan, bring the milk, cream and vanilla to a boil. In another bowl mix the sugar, starch and egg yolks together. When the milk boils, pour half of the milk onto the egg mixture and mix immediately.
Put the milk back on the heat and add the egg mixture into the pot. Put on medium heat and mix constantly until the cream is thick and reaches a boil for 1 minute. Always mix! You don't want to burn the bottom of the cream :)
Scoop out onto a tray covered in plastic wrap and refrigerate until cold. You can also put it in the freezer for about 5-10 minutes to cool it faster and then store in the fridge.
Now, combine the cooled pastry cream with about 25% whipped cream.
Assembly:
Cut the puff pastry into three even sections lengthwise. Fill a pastry bag with the cream and pipe the cream on top of the first layer of puff pastry. Spread the cream with a spatula so it is evenly distributed and without holes. Place second layer of puff pastry on top. Repeat the layer of cream and top off with another layer of puff pastry. Top with a sprinkle of icing sugar or anything else you would like! In this photo I used the extra bits of puff pastry and crunched them up into small pieces to put all around the outside. Just cover the sides with left over cream and then press the crunchy bits into it.
VOILA! Phew, now go have a drink!
8.30.2012
last day of school
This happened a while ago (like two months ago) which shows you how far behind I am on blogging. Oh goodness.
Looking back now, I miss our crazy and silly class. We had so much fun and I miss seeing my friends every day. I'm definitely happy in my internship too so I can't really complain. On our last day of class we all got to make whatever we wanted and then we had a little feast together. It was a fun day of us just goofing around, singing, cooking and baking and having a good old time. I made peanut butter cookies because the rest of the world does not eat enough peanut butter and raspberry truffle brownies. My friend Alvin made his famous, delicious and too-spicy-for-me-but-i-eat-it-anyway curry. Its an amazing dish! Patricia made some amazing Polish dumplings and bread. It was all delicious!
I am lucky to have met some pretty great people here in Paris and wish we still got to play around like this every week. Have you had any fun cooking or baking parties with friend lately? What is your latest recipe?
peanut butter cookies
Oven: 350F/177C
3/4 cup (170 grams) unsalted butter room temperature
1/2 cup (105 grams) light brown sugar
1/2 cup (100 grams) granulated white sugar
1 large egg
1 teaspoon vanilla extract
3/4 cup (185 grams) peanut butter(smooth or crunchy, I use smooth)
2 cups (260 grams) all purpose flour
1/2 teaspoon baking soda
1/4 teaspoon salt
Beat the butter, brown and white sugars until light and airy. About 3-5 minutes.
While that is beating, combine the flour, baking soda and salt in a separate bowl.
Beat in peanut butter to the butter/sugar mixture.
Add the egg and vanilla extract and mix until combined.
Add the flour mixture to the peanut butter mixture and combine. Add nuts, optional.
Let sit in refrigerator for 20-30 minutes.
Line a baking sheet with parchment paper.
Roll 1'' balls of dough and place on baking sheet.
Using the end of a fork dipped in granulated sugar, press the fork across the ball to flatten and make indented lines in the dough. Repeat at a perpendicular angle to make the criss-cross pattern.
Bake 10-12 minutes or until the edges are browned.
Labels:
baking,
bread,
Cookies,
pastry,
peanut butter,
recipe,
savory food,
school
8.06.2012
home baking with summer strawberries
In my fabulous new apartment I am happy to report that I now have a real, live, functioning oven! It is such a luxury here in the city. I am really excited to start using it once I am settled. In my last apartment I had this old microwave-oven that I had written off as a useless piece from the beginning. One night when I was waiting for my brother and his friends to get to my apartment I decided to give it a go and try to make a simple strawberry tart.
Lo and behold, the appliance wasn't useless after-all. When they arrived we had some wine, bread, meat and cheese and topped it off with this little dessert. It was a really nice evening with family and friends.
Here is the recipe if you want to give it a try. You don't have to use strawberries either. Just pick your favorite fruit!
Pate Sucre
250g flour
100g butter (room temperature)
100g icing sugar
1 egg
20g water
sift the flour.
cream the butter and icing sugar together.
add the egg. mix until smooth and homogeneous.
add the sifted flour.
if using a mixer, beat until the dough comes together.
if using your hands, use your hands or a scrapper to "frasage" the dough. basically, take a handful of dough and press it into the table while sliding your hand or scrapper so the dough smears. once all the dough has been frasaged, gather it. wrap in plastic and refrigerate 30 minutes.
Creme d'amande
250g butter (softened)
250g sugar
250g almond powder
200g eggs
50g flour
40g rum (optional)
5g vanilla extract
cream the sugar and butter together.
add the almond powder and cream together.
add the eggs, one by one.
beat the mixture to "blanch" it. (make it white in color)
add sifted flour, mix.
add rum and vanilla. mix to combine.
cover and fridge.
roll out your pate sucree, poke the dough to make holes for steam while it bakes. line your tart ring or pan with the dough and bake until golden. let the shell cool. pipe the creme d'amande into the bottom of the shell and top with strawberries. you can put the strawberries in whole or cut them in half and lay them in a spiral design. top with a sprinkle of icing sugar. store in fridge.
bon appetit!
Subscribe to:
Posts (Atom)